

Like the last installment of a modern young adult movie franchise like Harry Potter, Twilight (ugh), The Hunger Games, and Divergent; this assignment has two parts to it - Part 1 introduces you to screencasting, and Part 2 involves using your MV YouTube account to upload and share your screencast. Make sure you do both parts!
__________________________________________________________________________
Part 1: Screencasting
First things first: what is screencasting exactly? Screencasting is the act of video recording the activity on your computer's screen. Most screencasts include an audio narration, allowing the presenter to guide the audience through the presentation. You can create screencasts to flip your classroom, to create short videos for self paced assignments in class, to add videos to different class activities or even quizzes using Google Forms, or to have students create screen recordings to demonstrate understanding. You have a wealth of free screencasting tools from which to choose, each with their own strengths.
For the first part of this activity, you will be introduced to a number of different screencasting tools. Choose 1 to use to create your own screencast. "You must Choose, but Choose Wisely." ~ Indiana Jones and the Last Crusade__________________________________________________________________________
Screencast-O-matic
Screencast-O-Matic is the original online screen recorder for one-click recording from your browser on Windows or Mac with no install.
Screencast-O-Matic is the original online screen recorder for one-click recording from your browser on Windows or Mac with no install.
__________________________________________________________________________
Screenr
Screenr’s web-based screen recorder makes it a breeze to create and share your screencasts around the web, with no program to install. (No students under 13 may create content using Screenr.)
__________________________________________________________________________
Snagit
Snagit is a screen capture and recording extension that works on Chromebooks or in the Chrome browser. It is tied to your MVGMail account, so your videos are stored in Google Drive and are easy to share or add to your MVYouTube channel. (Need written permission for students under 13 to use.)
__________________________________________________________________________
SMART Recorder:
SMART Recorder is a great option IF you are using a school computer AND you have access to a microphone. If you decide to download Smart Notebook at home, you need to get version
11 (not the newest one!). If you are using a Mac and have the latest operating system, this option will not work for you - your computer is just too new!
On your school computer there is a product included in SMART Notebook software called "SMART Recorder." To access SMART Recorder, go to: Start Menu, All Programs, SMART Technologies, SMART Notebook, SMART Recorder.
The SMART recorder will then appear on your desktop. You can also right click on it from the Program's menu and create a shortcut on your desktop.
Here's a video on how to use SMART Recorder:
__________________________________________________________________________
To Complete Part 1:
- Choose a screencasting tool and create an account.
- Create a screencast (about anything you might share with your students!).
__________________________________________________________________________
Okay, now for part 2! Many of you have probably already created a school YouTube account, but if you haven't, here is your chance! Your MVGmail account is tied to YouTube, so if you are logged in to your account already, you can easily access your school YouTube account. The following instructions will also show you how to customize your privacy settings as well as block out pesky advertising. (Note: Even if you have an account already and have checked your privacy settings, it's worth checking them again. YouTube has reworded their options, so my account was more public than I wanted it to be.)
__________________________________________________________________________
Part 2: Creating a MV YouTube Channel
1. Log into your Mounds View Apps (email, calendar, etc.) account.
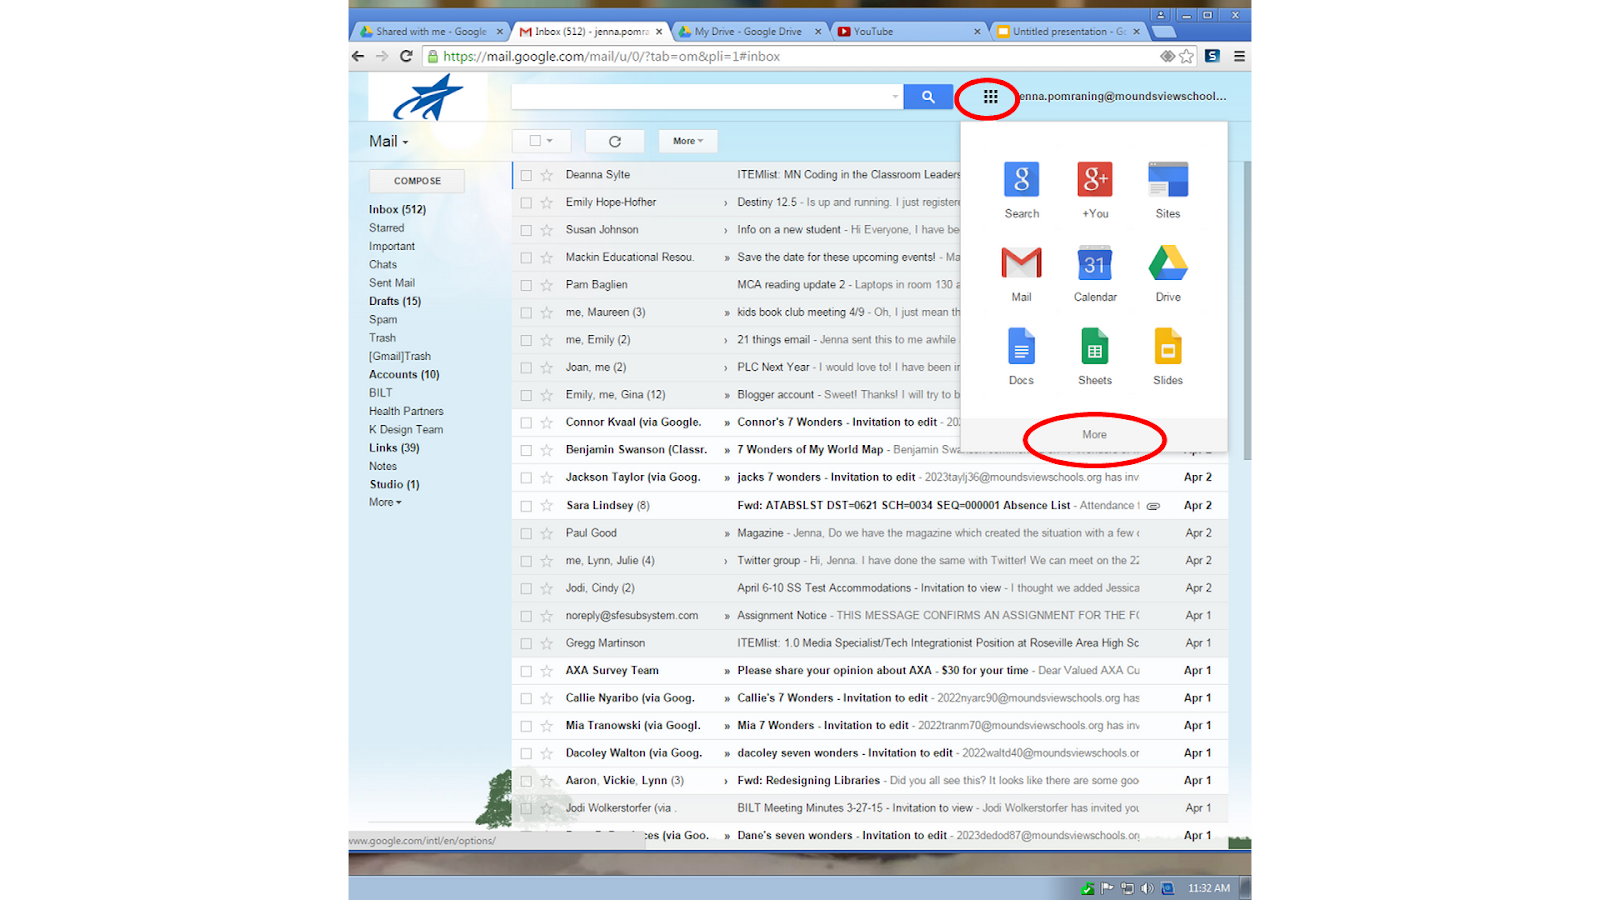
2. Click on "more" in the Rubik's cube/waffle icon at the top of the page to find YouTube.
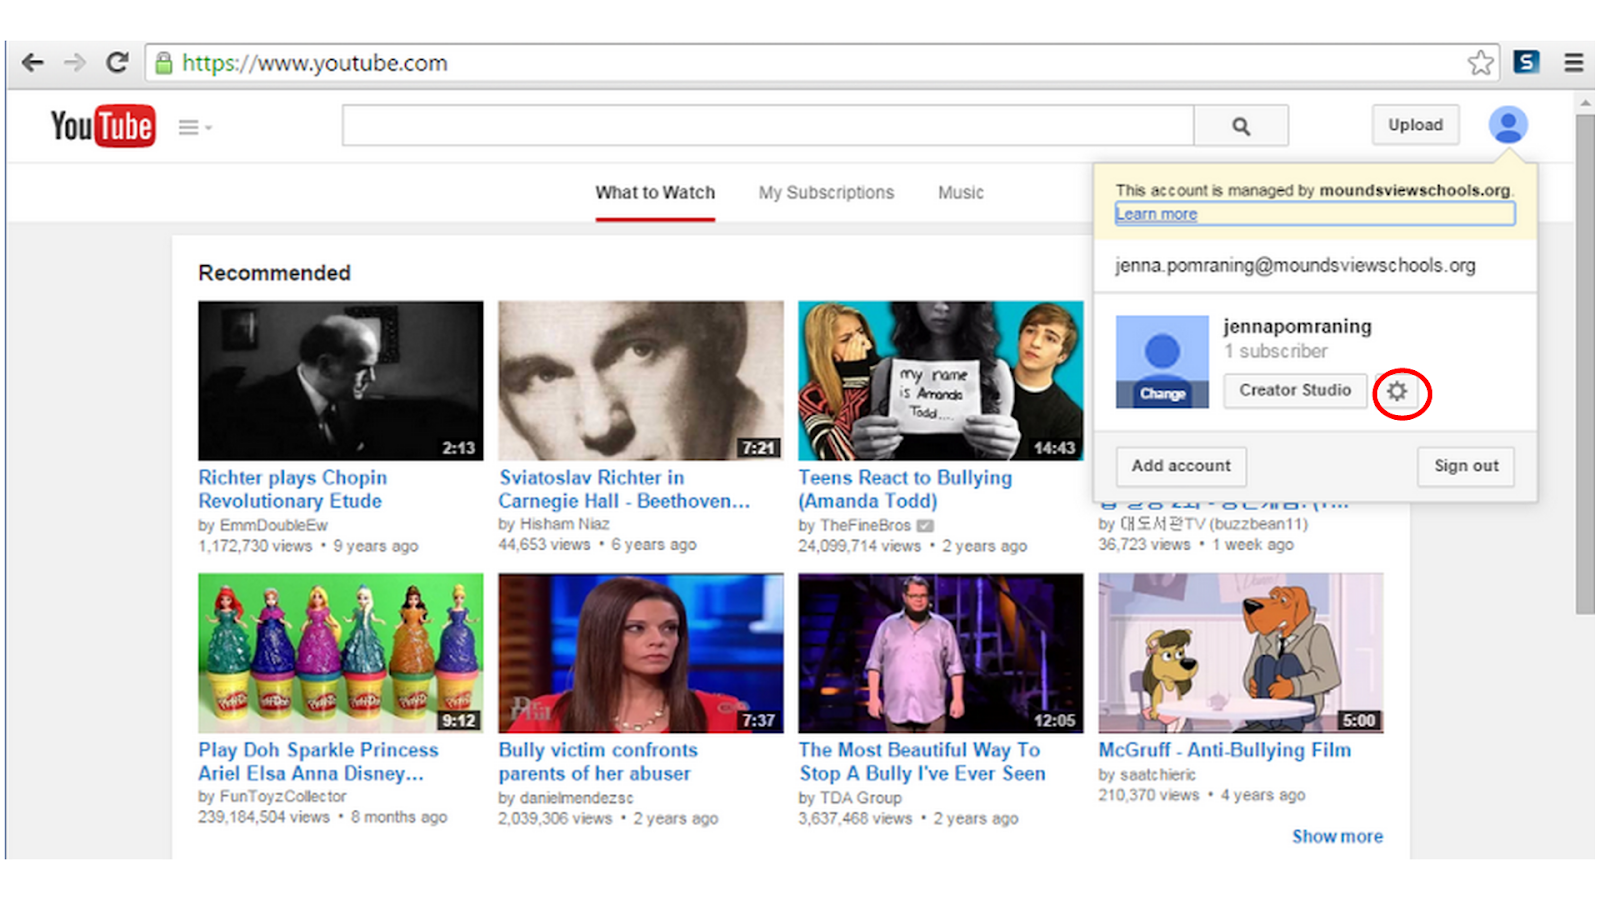
3. At the top right, you will see your photo, if you've added one, or a blue person if you haven't. Click on it and click on settings.
4. Check out the different pages of account settings. The most important are the privacy settings. Decide if you want students and parents (and whoever else may come across it) to have access to your list of favorite videos and subscriptions). Hit save on each page that you change.
5. In the overview section, select "Create a channel."

6. Use your full name for your username, first and last with no spaces. If your name is not available, add a number at the end to create a unique username. Fill in the rest of the information.
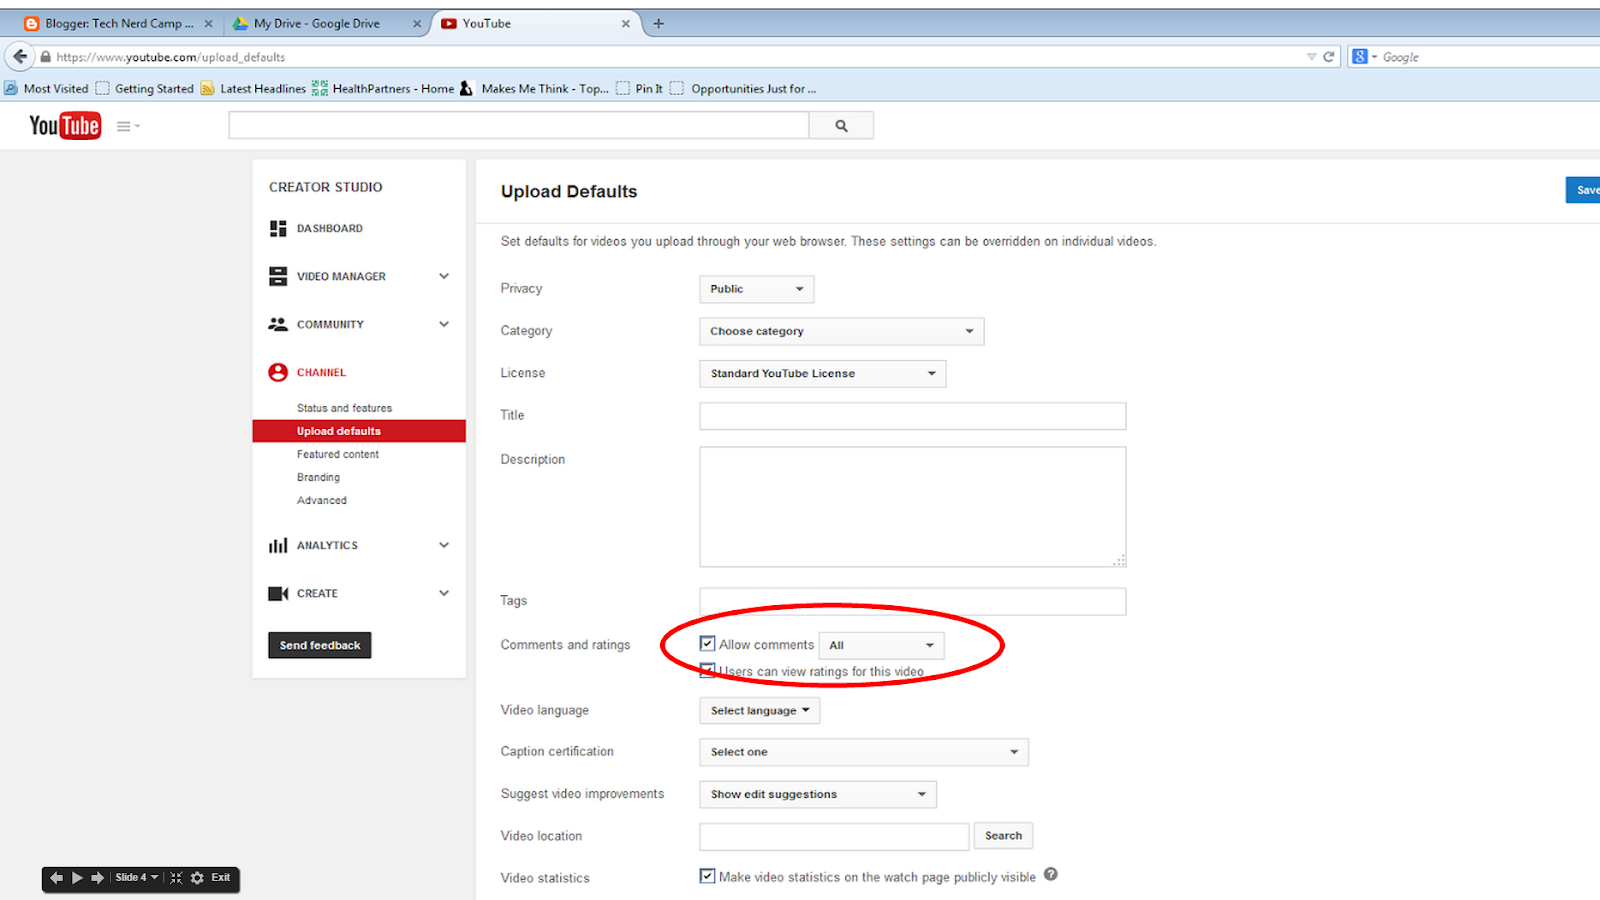
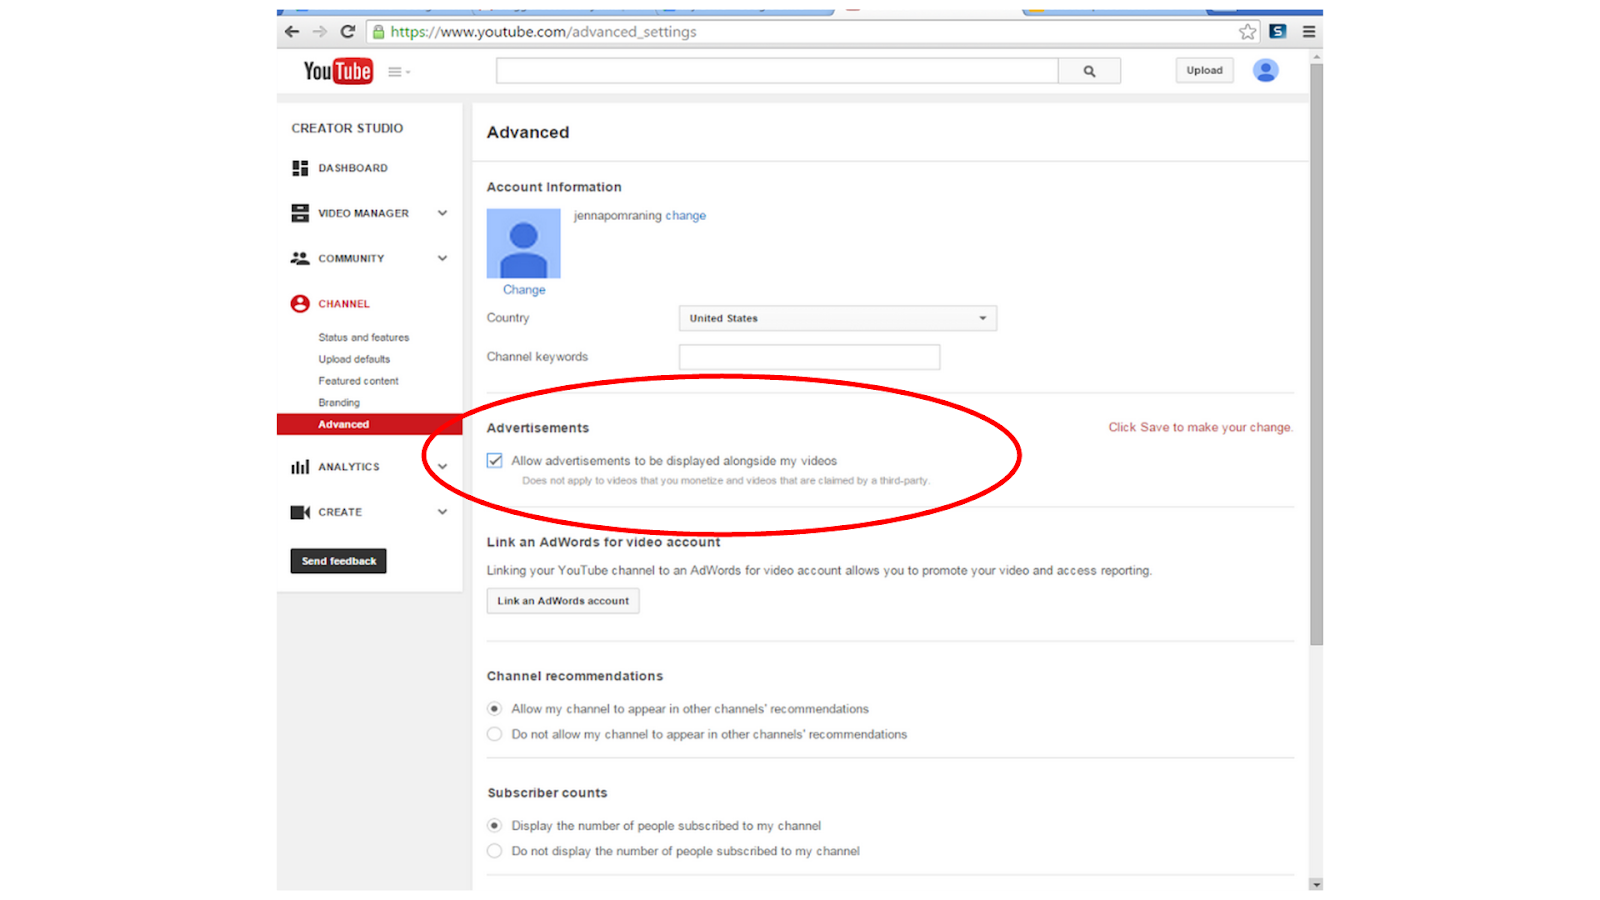
7. Once you have created a channel, you should go back to settings. On the Overview page, click on View Additional Features. We would recommend going to Upload Defaults to disable comments and going to Advanced to disable ads from appearing next to your videos.
Congratulations! You are now ready to upload videos!
__________________________________________________________________________
To Complete Part 2:
- Create your MV YouTube account.
- Upload your screencast.
- Embed the screencast into a post on your blog using the insert video option from menu (video must be on YouTube). You can also embed using the HTML embed code (a little more challenging).
- Post a reflection about the process and how you could use this with your students.
- Comment on 3 other tech nerd campers's blogs.
Further Investigation
There are many different resources available for sharing videos in different ways. They can be shared easily by creating a link to a video that you share with your class. There are more advanced delivery methods that can enhance what a video can do.
SafeShare.tv: Create a link to your YouTube video that displays your video without and advertisements and extra videos along the side.
Google Forms: You can embed a video into a Google Form to make a video question on a formative assessment or to create video tutorials to go along with a branching form. We will cover branching forms activity 8 so keep this in mind when you get to that activity
VideoNot.es: Using this app your students can take notes while watching a video and the notes are time stamped so students know when each note was started. This app can also be connected to Google Drive so student video notes are all saved in their Google Drive. You will learn how to connect an app to Google Drive in activity 5.
Ted-Ed: At Ted-Ed you can take any YouTube video and transform it into a complete lesson. You can embed questions in the video, create links to additional content, create discussions within the video, and more. To see what you can do, the link goes to the video tour of Ted-Ed.
Zaption: Take a video and trim it to the content you want. Add multiple videos that play 1 after the other. Add content to the videos link images, text, links to other websites, and formative assessments.
EdPuzzle: Make your videos come to life using this tool. You can crop videos, add your voice, and embed quizzes and open-ended discussion questions. Find videos directly on the site through YouTube or Khan Academy, or upload your own content. (Parental consent required for students under 13 to create using EdPuzzle.)
EdPuzzle: Make your videos come to life using this tool. You can crop videos, add your voice, and embed quizzes and open-ended discussion questions. Find videos directly on the site through YouTube or Khan Academy, or upload your own content. (Parental consent required for students under 13 to create using EdPuzzle.)
These are just a few. Here is a link to a list of others and a Google search can find several more.
No comments:
Post a Comment